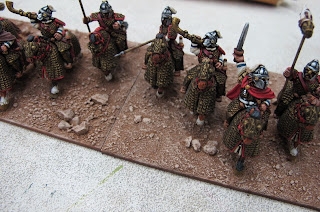
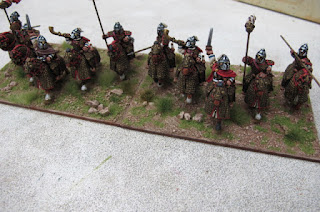
A few people have asked me about my basing, so I thought I would do a step by step guide. If I miss something I apologise, please feel free to ask if I have or if somethings not clear.
These are the two units of 28mm Cataphracts just completed for my Late Roman Impetus army.
Bases are 120mm x 80mm 3mm ply supplied by Litko.
Figures are first glued down with PVA and left to dry ( sometimes over night )
PVA is then applied with an old nylon brush.....straight, not watered down. I use it quiet liberally as well.
I use a mix of different grades of textured 'grit'.....starting with beach sand ( this is good because there's all sorts of irregular size bits n pieces in there ) and a little model railway ballast all mixed in together. This is the core basing material.
Pet litter is the other added extra, but used sparingly for this purpose.
This bag has lasted years, and is good for making all sorts of terrain features. Very versatile stuff, and cost effective.
Base is then immersed in sand and much of the excess carefully tipped/tapped off. ( I use a craft beading tray for this as it has a nice little hole in one end to pour back into your storage container )
Units were then left over night to dry. ( I also clamp my bases to the table top while drying to stop any warping ). Small clamps from the $2 shop are good enough for this. Spring or h clamps will do the trick.
Once dry brush off excess.
Next is the base coat. Jo Sonja craft paint is my weapon of choice- Provincial Beige. Vallejo - Cork is roughly the same colour.
Paint needs to be watered down, about 50/50. It needs to be thin enough to make it easy to apply but thick enough to cover and stabilise the sand, bedding down your basing material. It'll take some practice to get it just right but when you do you'll know what I'm talking about.
Once again I leave overnight to dry, but you could get away with 2-3 hrs if you were in a hurry.
Dry brushing is next, starting with a mix of the base colour and a lighter shade Jo Sonja - skin tone is what I use.
First highlight at 50/50
Second highlight straight -skin tone
Now for some flocking, I use the fine green ground foam from model railway suppliers.....the shade is up to you, I go for a more olive green than a brighter spring green but it's up to you what you prefer.
I try and make this as irregular as possible and not too much I feel is better, but once again up to you. Applied with straight PVA.
Carefully tap off excess and allow to dry before going on to the next step is preferred but not essential.
Tufts of grass is next, lots of brands out there and many shades. I like to use a mix of seasons for variety. Flowers are also an option here for those in tune with their feminine side : )
They come ready to go.....but I use a little drop of Tarzans grip to make sure they don't come off......ever.
I also like to paint the edges of my bases, light olive green......but that's just me.
Their ready to rock n roll.
Hope this helps chaps, and you get something out of it.
Cheers
Richard.


Thanks Rich - they look very nice. One of the better tutorials for basing as you show the actual materials. Many others don't.
ReplyDeleteNicely done! And pretty much the way I do it too(:
ReplyDeletecomplex
ReplyDeleteFor some
DeleteVery interesting; also similar to the way I do it, except I used a coloured paste instead of grit, and don't use the foam. Have you tried dry-brushing the tufts with Buff Titanium? It can be very effective for dry grass.
ReplyDeleteCheers, Simon
And that is why your bases look so good Tarters, your prepared to put in just a little bit more effort for a lot more gain, great stuff. I agree with the bat a little greying off of dried grass is very effective
ReplyDeleteGlad to see you are finally using new cat litter Tarty, some up boys down cloob thought it were your Beeoooh.
Well so far we have snapped on the DnR inks and the JS acrylics, I would say great minds about here but there is only one of you :-]
Very nice tutorial. Your bases do look great!
ReplyDeleteChristopher
Thanks all...nothing ground breaking here but could be of assistance to some. Must try the dry brushing of tufts, thanks for that Simon.
ReplyDeleteA great tutorial thanks, and great looking troops too!
ReplyDeletegreat work mate, I do something very similar....
ReplyDeleteI have also awrded you a liebster blog award mate
http://3.bp.blogspot.com/-0SxAjp1WmhI/UK049MvaCvI/AAAAAAAACXE/LG91sZJF6W4/s320/liebster-blog-award.jpg
see my blog for details
cheers
matt
" I have also awrded you a liebster blog award mate ".....thanks mate whatever a liebster award is ?
ReplyDeleteVery nice basing technic!
ReplyDeletePhil.
Great basing thanks for the information
ReplyDelete